I eventually did manage to write more of this series, but it took a bit longer than expected. Round two again with a pretty close range comp, this time shield.
Comp Idea
This time, we are looking at a “close range” shield comp. Most notably this has the option to pin down a Marauder and hold it indefinitely, giving you chances to frag everything around it, or grind it down in a reasonable time with it’s DPS and Neuts. There are a lot of variations of this with armor RTC Scimitar floating around, which can increase your Sleipnirs range significantly. For this exact version I opted to however not have this, in favour of a capstable and well-tanked Logi. Instead we rely on a single TD to get us close enough to a Marauder (which was enough even before the Marauders lost TD resist with a Vargur).
Ships
Sleipnir x2 - x3
Curse
Broadsword / Onyx
Scimitar
Sleipnir
The Sleipnir is a very much standard autocannon fit, which can stay on grid on it’s own for a bit and should be able to make quick work of nano cruisers, should they get to close. The range really isn’t that great however, and it can be outkited.
Links wise you obviously want to have different ones on each of your Sleipnirs. I think the priority is Rapid Deployment > Shield Harmonizing > Interdiction Maneuvers > Electronic Superiority > Shield Extension > Active Shielding, but I think it is somewhat situational. Double Skirm might work really well if your enemy flies a lot of small stuff, while vs slower ones you can go for Shield Links more directly.
[Sleipnir, 425mm 50mn XLASB A11]

Tracking Enhancer II
Gyrostabilizer II
Gyrostabilizer II
Gyrostabilizer II
Nanofiber Internal Structure II

50MN Cold-Gas Enduring Microwarpdrive
X-Large Ancillary Shield Booster
Federation Navy Stasis Webifier
Multispectrum Shield Hardener II
Caldari Navy Warp Disruptor

425mm AutoCannon II
425mm AutoCannon II
Shield Command Burst II
425mm AutoCannon II
Skirmish Command Burst II
425mm AutoCannon II
425mm AutoCannon II

Medium Processor Overclocking Unit II
Medium Projectile Ambit Extension I


Warrior II x5


Improved Blue Pill Booster
Synth Sooth Sayer Booster
Agency 'Overclocker' SB7 Dose III


Barrage M x800
Hail M x800
Navy Cap Booster 400 x27
Nanite Repair Paste x300
Republic Fleet Depleted Uranium M x800
Republic Fleet EMP M x800
Republic Fleet Fusion M x800
Republic Fleet Phased Plasma M x800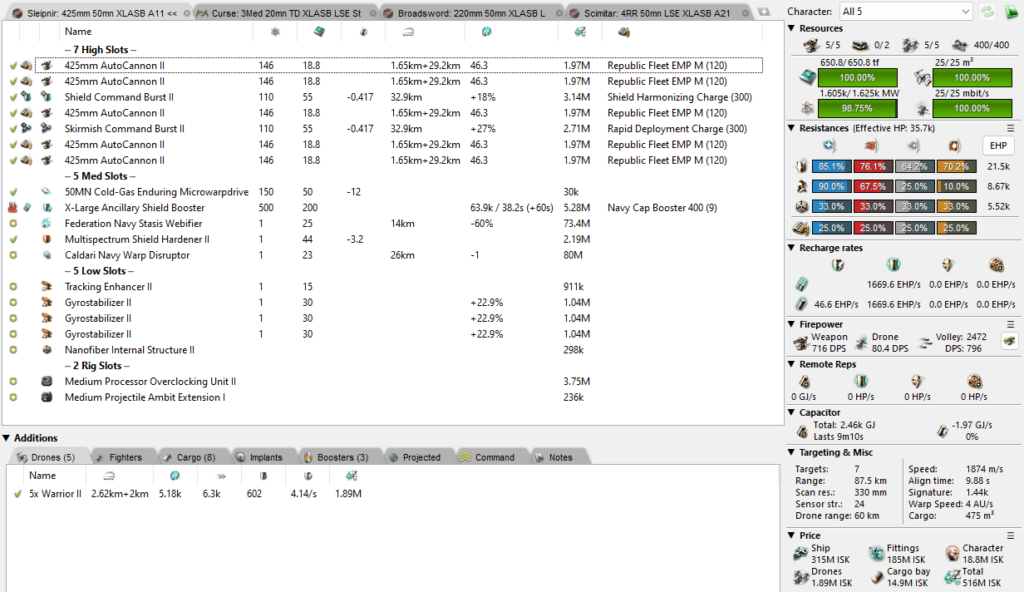
Curse
The typical Curse fit in this comp is a fully buffer shield one. I experimented with XLASB + TD ones and kinda like the slightly higher speed and extended buffer that you get with it, as well as the chance to regenerate health quite rapidly on your own. The downside of it is of course that you lose your small neuts, and I haven’t found a version where you get everything – there just isn’t enough fitting space. If you find one please let me know.
[Curse, 3Med 20mn TD XLASB LSE Stable]

Nanofiber Internal Structure II
Nanofiber Internal Structure II
True Sansha Power Diagnostic System
True Sansha Reactor Control Unit

Corelum C-Type 50MN Microwarpdrive
Thukker Large Cap Battery
Compact Multispectrum Shield Hardener
X-Large Ancillary Shield Booster
Republic Fleet Large Shield Extender
'Investor' Tracking Disruptor I

Corpum C-Type Medium Energy Neutralizer
Core Probe Launcher I /OFFLINE
True Sansha Medium Energy Neutralizer
[Empty High slot]
Corpum C-Type Medium Energy Neutralizer

Medium EM Shield Reinforcer II
Medium Ancillary Current Router II


Acolyte II x5
Caldari Navy Vespa x5
Valkyrie II x5
Hornet EC-300 x5


Improved Blue Pill Booster
Agency 'Overclocker' SB5 Dose II


Navy Cap Booster 400 x27
Core Scanner Probe I x8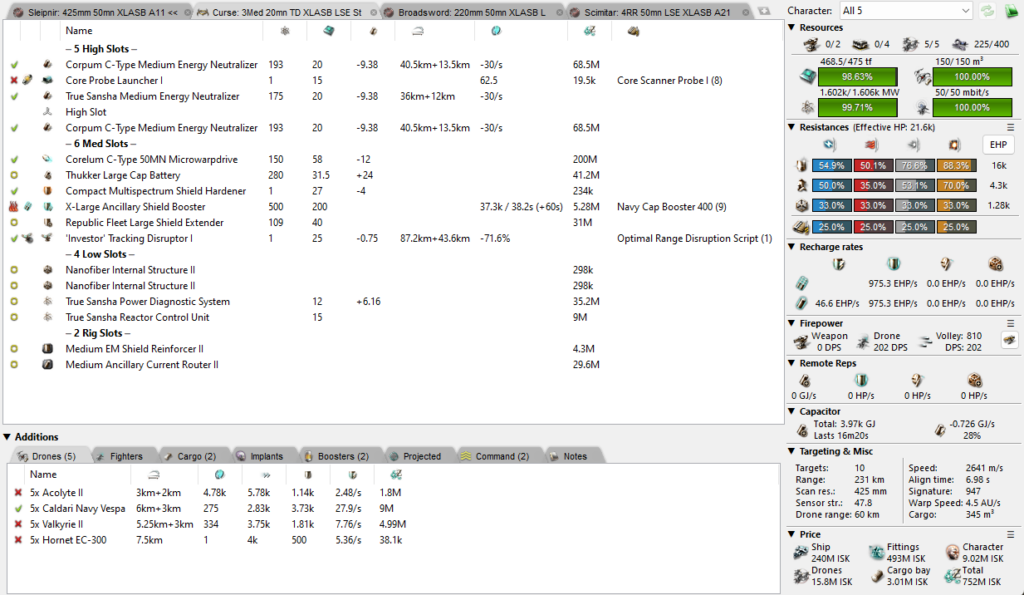
Broadsword / Onyx
On the Onyx and Broadsword there are actually a few different ways to fit them. Either one can opt to get some more DPS on them, which then limits the survivability, or one can go more supportive with multiple Warp Disruption field generators. I started of with an Broadsword fit that would almost be able to go out solo, but soon realized that these ships are pretty scary, and getting fights with them is hard. As such I gravitate towards more support oriented variants nowadays. I think the same version with full tank mid is a decent tradeoff. But fully getting rid of the guns could give you the interesting property that you do not have to decycle your HIC point once you get shot at as you get more than enough tank if you bling it. I think it is generally a good Idea to not HIC-Point a Marauder until he MJDs, so that he can’t preemtively shoot you and then MJD when you are low.
[Broadsword, 220mm 50mn XLASB LSE B11]

Nanofiber Internal Structure II
Co-Processor II
Gyrostabilizer II
Gyrostabilizer II

50MN Quad LiF Restrained Microwarpdrive
X-Large Ancillary Shield Booster
Caldari Navy Large Shield Extender
Multispectrum Shield Hardener II
Multispectrum Shield Hardener II
Small F-RX Compact Capacitor Booster

220mm Vulcan AutoCannon II
220mm Vulcan AutoCannon II
220mm Vulcan AutoCannon II
True Sansha Warp Disruption Field Generator
220mm Vulcan AutoCannon II
220mm Vulcan AutoCannon II

Medium Processor Overclocking Unit II
Medium Ancillary Current Router I


Improved Blue Pill Booster
Synth Sooth Sayer Booster
Agency 'Overclocker' SB5 Dose II


Barrage M x800
Hail M x800
Navy Cap Booster 400 x32
Nanite Repair Paste x300
Phased Plasma M x800
Republic Fleet Depleted Uranium M x800
Republic Fleet EMP M x800
Republic Fleet Fusion M x800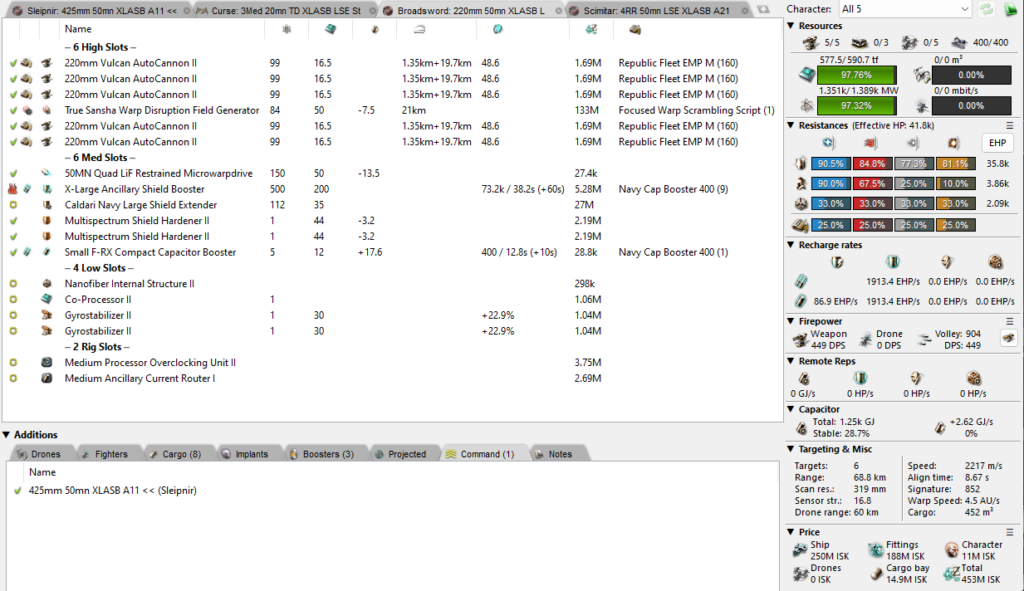
For the Onyx the same tradeoff as with the Broadsword also applies, you essentially have to choose if you want to be more supportive or more of a solo fit. You get the RLML projection which can help clear some lighttackle of of people that are further away, but you loose some speed (Onyx has exactly the same base Speed as a Sleipnir, Broadsword is faster).
[Onyx, RLML 50mn LSE XLASB No abyssal]

Nanofiber Internal Structure II
Nanofiber Internal Structure II
Ballistic Control System II
Ballistic Control System II

50MN Quad LiF Restrained Microwarpdrive
Republic Fleet Large Shield Extender
X-Large Ancillary Shield Booster
Multispectrum Shield Hardener II
EM Shield Hardener II
Small Capacitor Booster II

Rapid Light Missile Launcher II
Rapid Light Missile Launcher II
Rapid Light Missile Launcher II
True Sansha Warp Disruption Field Generator
Rapid Light Missile Launcher II
Rapid Light Missile Launcher II

Medium Ancillary Current Router I
Medium Warhead Calefaction Catalyst II


Improved Blue Pill Booster
Synth Crash Booster
Agency 'Overclocker' SB7 Dose III


Inferno Fury Light Missile x500
Mjolnir Fury Light Missile x500
Nova Fury Light Missile x500
Scourge Fury Light Missile x1000
Navy Cap Booster 400 x30
Caldari Navy Inferno Light Missile x500
Caldari Navy Mjolnir Light Missile x500
Caldari Navy Nova Light Missile x500
Caldari Navy Scourge Light Missile x1000
Nanite Repair Paste x200
Focused Warp Disruption Script x1
Focused Warp Scrambling Script x1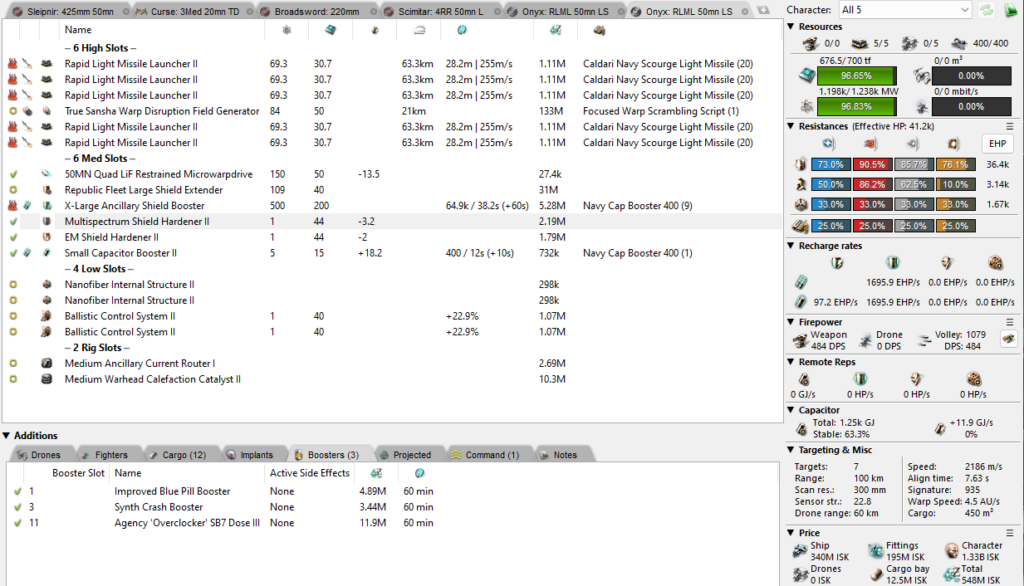
Scimitar
Again a very standard fit, there are a few similar variations floating around which largely do the same thing. I elected to go with a bit less excess capacitor and crammed a Damage Control in for it. If you have low cap skills, aim for a variant with tripple Power Diagnostics in the lows. When flying this thing keep in mind the particularities of each of your dps ships. The Broadsword / Onyx can not be repped when they hic point, but otherwise have pretty good resist, the Sleipnirs have ok resist and buffer and the Curse doesn’t really have either of them. As a result you want to stick somewhat close to the Curse most of the time. If the Curse is primed you rep him, if the Scimitar is primed the Curse neuts out thing that come to close, so your job is Dragging the enmies trough the Curse.
[Scimitar, 4RR 50mn LSE XLASB A21 <<]

Nanofiber Internal Structure II
Mark I Compact Capacitor Flux Coil
Dark Blood Power Diagnostic System
IFFA Compact Damage Control

50MN Quad LiF Restrained Microwarpdrive
Thukker Large Cap Battery
X-Large Ancillary Shield Booster
Multispectrum Shield Hardener II
Caldari Navy Large Shield Extender

Pithum C-Type Medium Remote Shield Booster
Pithum C-Type Medium Remote Shield Booster
Pithum C-Type Medium Remote Shield Booster
Pithum C-Type Medium Remote Shield Booster

Medium Ancillary Current Router II
Medium Ancillary Current Router II


Hornet EC-300 x4
Light Shield Maintenance Bot II x5


Improved Blue Pill Booster
Agency 'Overclocker' SB7 Dose III


Navy Cap Booster 400 x36
Nanite Repair Paste x100
Agency 'Overclocker' SB7 Dose III x1
Improved Blue Pill Booster x1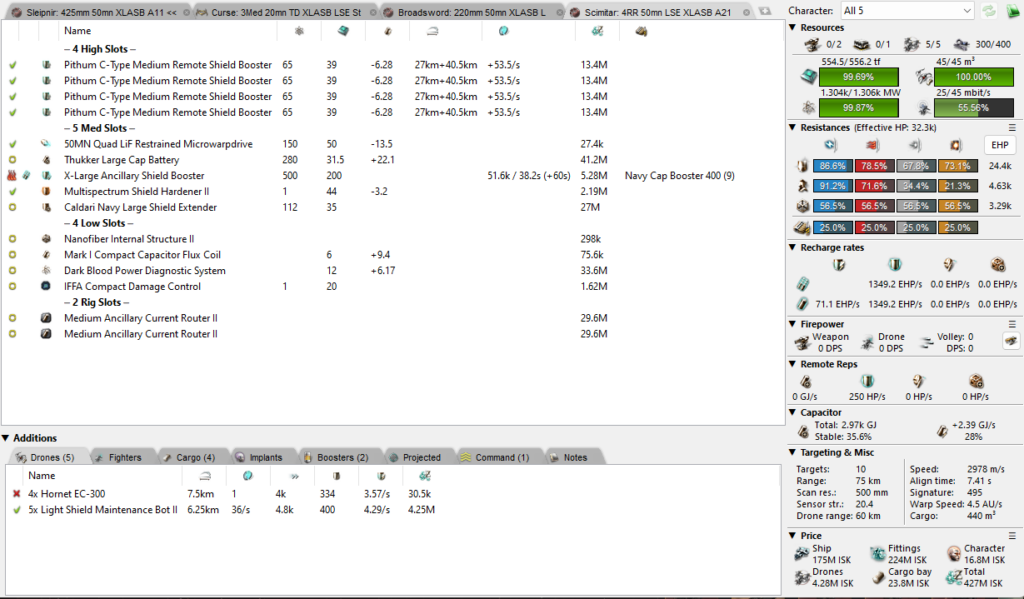
Comp In Action
We had done some runs with this comp before the TD Changes and it worked decently well. I think at this point I was still experimenting with an injected Curse, which had lacking longjevity. Here is an unedited video:
Later on, we also manage to try ourselves on an admittedly not very smart Vargur and that worked just fine.
Spot in the Meta
I think this one is somewhat self explanatory, this comp does well against a lot a lot of the cruiser based control like Vedmaks as well as Sigtanking things, if you do manage to catch them. The chances to slowly escalate are however much better with this that with the Vedmaks from last time. At the same time it can deal with one marauder and kill it. Kiting vs Battleships also works decently well, as you are guaranteed that they don’t MJD out. If you end up fighting multiple marauders, then the big battlecruiser signatures don’t help, and you will need to stay on the one Marauder furthest out, which is not ideal, and might even force you to leave grid if they are MJDing heavily. Again with these closer range comps a big threat is projected DPS towards your logi, so eventually it breaks down.